Thursday, August 7, 2014

Decal Time

The Lightning model project lingers on.

So... some of the masking wasn't perfect.. some of the spray paint wasn't even.
Oscillated a few times between painting the dorsa via brush and fixing up the overspill with spray. And vice versa (and mixing up surgical spirits along with white - bad move)

Then the spray ran out.

Time do the decals mayhap- a little bit of detail will surely distract from the painting mess, how hard could it be?
Somewhat stressed readding the application of decals as apparently "silverring" is to be avoided.
Know not what this silverring thing is but prepare to avoid it by giving the Lightning a good old coat in Klear and a couple days when I have to do other things.

Turns out decals aren't so bad - you can try it the proper way i.e. 20 second soak, gentle nudge with a QTip, or do Old Skool - submerge the area and ram the decal wherever it will go until the least unacceptable position is found and resist the temptation to tweak it just a little bit as per as per.

Without  further ado, here is Lightning,with certain decals that I could actually see:


(Hides a multitude of sins)

Wednesday, July 30, 2014

Per Ardua ad Astra

Warning, the photography has regressed, if you want to see some modelling and photography by somone who knows what they are doing, check out http://www.arcair.com/Gal12/11401-11500/gal11464-Valkyrie-McFarland/00.shtm


Otherwise proceed to the shambles.

It can be postponed no longer, time to cross the Rubicon and attach the canopy. NB given the apparent importance of said canopy I have massaged it with surgical spirits, Dremelled it with toothpaste and given it 2 dips in Klear over 48 hrs. Seriously thought about getting 0000000001 grade wet paper or specialist car polishes, but regarded the serendipitous discovery of the magical Klear floor polish as a reasonable level of care. So this is what it looks like:

That's right - can't see a thing but at least its shiny.
Time to mask up

And spray paint that baby

The dilemna now is since the spray finish look so good, do I proceed with brush painting the dorsa and tailplane as per F2 instructions?
This might just be the excuse to get an airbrush.

Tuesday, July 29, 2014

TataTaTaTaaTaa..TaaTaaTaaTaaaaa...(repeat)

Or something similar- wings, fuselage etc have come together and it's starting to look like a Proper Airfix kit
- and only one swoosh, swoosh, DagadagaDagaDagaaa... episode that I will confess to.
No more posts till the canopy is on, by chance we have the magical Klear, so watch this space.

Thursday, July 24, 2014

New! Improved! Photography!


I have been advised by a somewhat more technically minded  friend that the pictures in this blog constitute a crime against photography. The advice was in the first instance stop using a flash, so lacking any suitable lighting, took the opportunity of the continuing presence of the Big Light in the Sky in these parts took a few shots outside.

Before

(actually, that was surprisingly effective)

After

Whoa!  Now that really captures my painting skills.

And how goes the build? Increasingly fraught.  As it becomes time to stick the assembled components together, any discrepancies are revealed, e.g. here is some of the residue from paring the nose ring sufficiently to fit on the front (and back to crap photography):
The whole cockpit assemblage has obviously been located incorrectly, leaving me to dread fitting the canopy (apparently the quality and finish of the canopy is the sine qua non of Plastic Modelling - ulp).  

Tuesday, July 15, 2014

Now For Something Completely Different... Revisiting Airfix

For the man who has everything, and is minus the family for a week, what better distraction than attempting to relive my childhood with The Best Airfix Ever of the  The Iconic British Contribution To The Cold War.
And its all silver - how hard could it be?
First step was to make some 45cm square "portable modelling workshops". Why 45cm? Because that's the width of the ply left over from 2m square I bought to make a lid on the water butt.
Can't put this off any longer - we are at T minus 5 days when the kids return and will want to play or help with any toy sized jet plane. The plan is to have this done and dusted and safely ensconced in one of our display cabinets in lieu of the various pieces of wedding related crystal currently resident (and seeing as this is our 18th anniversary - no better time),

First stop, the most excellent Marks Models where I decline an invitation to a barbecue and only just resist the temptation to go Big Time and get an airbrush.  A rattle-can of silver, 5 random 15ml tins, glue with with a metal pipette and some specialist masking tape and I'm good to go. But World Cup final precludes anything other than the occasional browse of youtube where it soon becomes apparent I really should have gone for an airbrush.
But oh boy am I ready

Crossing the Rubicon

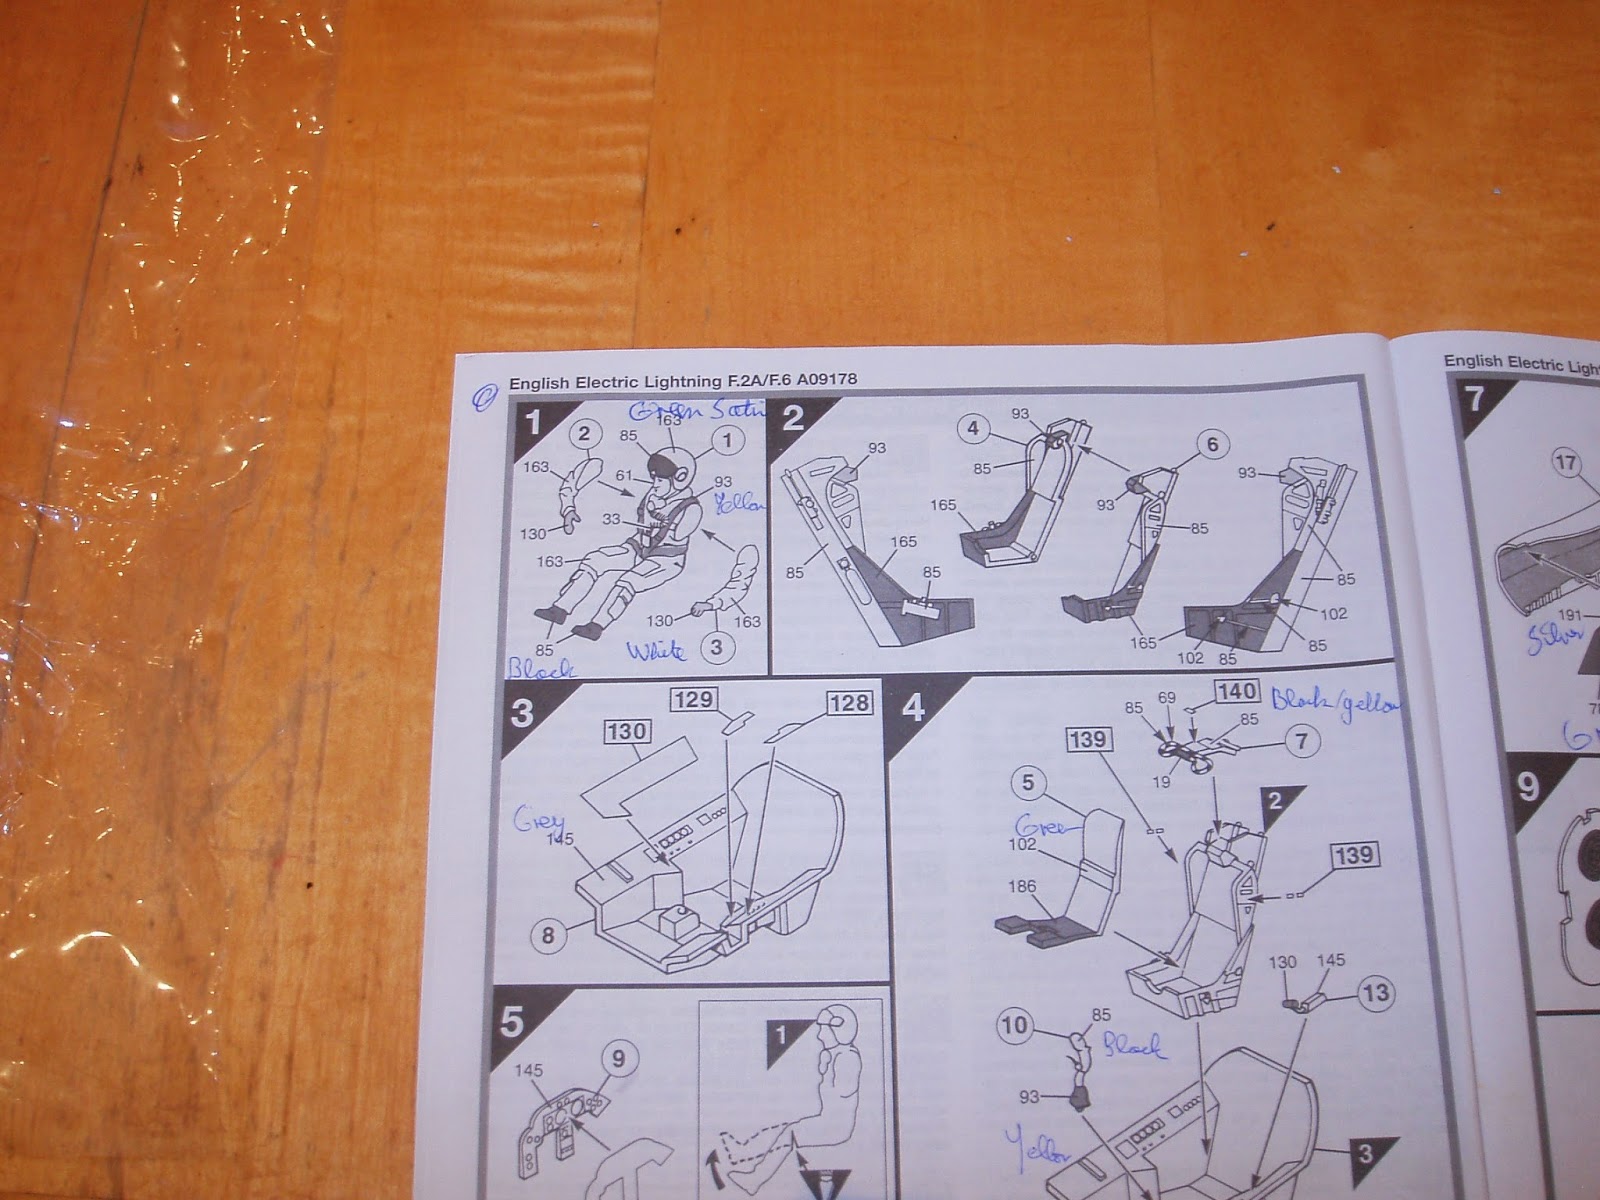
This can be put off no longer. Time to open the box and start putting this mother together. And at step 1, Houston we have a problem,

There is a tiny little man in the model needing a gazillion different paint colours, The model cannot be stuck together and spray-painted with all-forgiving silver until this tiny man is in his cockpit. 
Even if the tiny man were to be left out, the cockpit still requires insane level of details otherwise the plane will be a Ghost Plan. Hmmm..... 
No, lacking flesh colour paint and limitted to 4 shades of silver, we will persevere and make tiny man and his acoutrements a worthy representation of those of risked and sometimes lost their live in the Cold War.

Just need to hold out till I get some flesh coloured paint. In the meantime, got back on Easy Street by spray painting some of the interior- now we're sucking diesel,


Friday, February 7, 2014

Picture for prior post

The Apollo Space Program and the non-stick frying pan

The landing of a man on the moon is celebrated because it:

  • Is a nerdgasm of mankind's greatest achievement; the culmination of the Enlightenment
  • Was the pivotal battle in which the Cold War was won
  • Was an unsustainable economic drain that along with the Vietnam war led to the collapse of the gold standard and ultimately the economic meltdown of 2008
  • was JFK's legacy
  • was fictitious
  • was really really cool and anyone who thinks it was fake identifies themselves as a bit mad
  • invented the non-stick frying pan
Of these points, I've engaged in heated debates on all bar the last. 

The received wisdom is that the non-stick frying pan was an inadvertent byproduct of the Apollo program. Therefore any misgivings about the overall project are allayed by the fact that millions of people have an easier job cleaning their frying pan thanks to Neil Armstrong and countless unsung heroes.

Except... whilst reading Richard Rhodes most excellent account of the development of the nuclear bomb I came across the claim that Teflon was invented by the Manhattan Project.

Say it ain't so Joe! 

This little nugget would be the start of an investigation worthy of a jaded alcoholic detective just shy of retirement - That Goes Right To The Top! 

Here is the truth as best can be established (i.e. wikipedia.org)
  1. Teflon, aka PTFE, was discovered  by accident and patented in 1938
  2. Yes, it was very valuable, and used in huge quantities by the Manhattan. But they weren't big into PR at that time
  3. 1954 Collette Gregoire finally persuades her husband to put some of that slippy stuff he uses for fishing onto a frying pan
  4. Tefal frying pan brand is introduced to the market, but it is many years before it achieves global dominance
So the Apollo program had zero influence on the non-stick frying pan. 
Fact. You can check it out on the internet if you don't believe me.

In the mean time, for reasons that are largely inexplicable, I've been replacing my Tefal frying pans with seasoned cast iron pans.(but will try not to contribute the blogosphere on this fascinating topic).

However, even without non-stick frying pans, Apollo was awesome.